Thursday, July 22, 2010

Plant seeds and watch them grow

What you'll need:

  • Fresh seeds of your choice such as pumpkins seeds, sunflower seeds, lima beans or pinto beans.
  • Good quality soil (loose, aerated, lots of peat moss), if you don’t have any you can buy some potting soil at your local garden store.
  • A container to hold the soil and your seeds.
  • Water.
  • Light and heat.

Instructions:

  1. Fill the container with soil.
  2. Plant the seeds inside the soil.
  3. Place the container somewhere warm, sunlight is good but try to avoid too much direct sunlight, a window sill is a good spot.
  4. Keep the soil moist by watering it everyday (be careful not to use too much water).
  5. Record your observations as the seeds germinate and seedlings begin to sprout from the seeds.

What's happening?

Hopefully after a week of looking after them, your seedlings will be on their way. Germination is the process of a plant emerging from a seed and beginning to grow. For seedlings to grow properly from a seed they need the right conditions. Water and oxygen are required for seeds to germinate. Many seeds germinate at a temperature just above normal room temperature but others respond better to warmer temperatures, cooler temperatures or even changes in temperature. While light can be an important trigger for germination, some seeds actually need darkness to germinate, if you buy seeds it should mention the requirements for that specific type of seed in the instructions.

Continue to look after your seedlings and monitor their growth. For further experiments you could compare the growth rates of different types of seeds or the effect of different conditions on their growth.
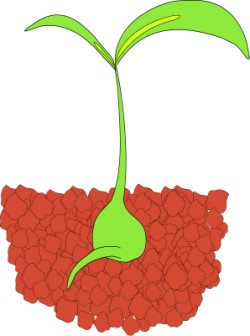
Sprouting seedling

Melting Chocolate

What you'll need:

  • Small chocolate pieces of the same size (chocolate bar squares or chocolate chips are a good idea)
  • Paper plates
  • Pen and paper to record your results

Instructions:

  1. Put one piece of chocolate on a paper plate and put it outside in the shade.
  2. Record how long it took for the chocolate to melt or if it wasn't hot enough to melt then record how soft it was after 10 minutes.
  3. Repeat the process with a piece of chocolate on a plate that you put outside in the sun. Record your results in the same way.
  4. Find more interesting locations to test how long it takes for the chocolate pieces to melt. You could try your school bag, hot water or even your own mouth.
  5. Compare your results, in what conditions did the chocolate melt? You might also like to record the temperatures of the locations you used using a thermometer so you can think about what temperature chocolate melts at.

What's happening?

At a certain temperature your chocolate pieces undergo a physical change, from a solid to a liquid (or somewhere in between). On a hot day, sunlight is usually enough to melt chocolate, something you might have unfortunately already experienced. You can also reverse the process by putting the melted chocolate into a fridge or freezer where it will go from a liquid back to a solid. The chocolate probably melted quite fast if you tried putting a piece in your mouth, what does this tell you about the temperature of your body? For further testing and experiments you could compare white choclate and dark chocolate, do they melt at the same temperature? How about putting a sheet of aluminium foil between a paper plate and a piece of chocolate in the sun, what happens then?

Chocolate

Steel Wool & Vinegar Chemical Reaction

What you'll need:

  • Steel Wool
  • Vinegar
  • Two beakers
  • Paper or a lid (something to cover the beaker to keep the heat in)
  • Thermometer

Instructions:

  1. Place the steel wool in a beaker.
  2. Pour vinegar on to the steel wool and allow it to soak in the vinegar for around one minute.
  3. Remove the steel wool and drain any excess vinegar.
  4. Wrap the steel wool around the base of the thermometer and place them both in the second beaker.
  5. Cover the beaker with paper or a lid to keep the heat in (make sure you can still read the temperature on the thermometer, having a small hole in the paper or lid for the thermometer to go through is a good idea).
  6. Check the initial temperature and then monitor it for around five minutes.

What's happening?

The temperature inside the beaker should gradually rise, you might even notice the beaker getting foggy. When you soak the steel wool in vinegar it removes the protective coating of the steel wool and allows the iron in the steel to rust. Rusting (or oxidation) is a chemical reaction between iron and oxygen, this chemical reaction creates heat energy which increases the temperature inside the beaker. This experiment is an example of an exothermic reaction, a chemical reaction that releases energy in the form of heat.

Steel wool

Test Your Dominant Side

What you'll need:

  • A pen or pencil
  • Paper or a notepad to write your findings on
  • An empty tube (an old paper towel tube is good)
  • A cup of water
  • A small ball (or something soft you can throw)

Instructions:

  1. Write ‘left’ or ‘right’ next to each task depending on what side you used/favored.
  2. When you’ve finished all the challenges review your results and make your own conclusions about which is your dominant eye, hand and foot.

Eye tests:

  1. Which eye do you use to wink?
  2. Which eye do you use to look through the empty tube?
  3. Extend your arms in front of your body. Make a triangle shape using your fore fingers and thumbs. Bring your hands together, making the triangle smaller (about the size of a coin is good). Find a small object in the room and focus on it through the hole in your hands (using both eyes). Try closing just your left eye and then just your right, if your view of the object changed when you closed your left eye mark down ‘left’, if it changed when you closed your right eye mark down ‘right’.

Hand/Arm tests:

  1. Which hand do you use to write?
  2. Pick up the cup of water, which hand did you use?
  3. Throw the ball, which arm did you use?

Foot/Leg tests:

  1. Run forward and jump off one leg, which did you jump off?
  2. Drop the ball on the ground and kick it, which foot did you use?

What's happening?

So what side do you favor? Are you left handed or right handed? Left footed or right footed? Is your right eye dominant or is it your left?

Around 90% of the world’s population is right handed. Why most people favor the right side is not completely understood by scientists. Some think that the reason is related to which side of your brain you use for language. The right side of your body is controlled by the left side of your brain, and in around 90% of people the left side of the brain also controls language.

Others think the reason might have more to do with culture. The word ‘right’ is associated being correct and doing the right thing while the word ‘left’ originally meant ‘weak’. Favoring the right hand may have become a social development as more children were taught important skills by right handed people and various tools were designed to be used with the right hand.

Around 80% of people are right footed and 70% favor their right eye. These percentages are lower than those who are right handed and this could be because your body has more freedom of choice in choosing its favored foot and eye than that of its favored hand. In other words you are more likely to be trained to use your right hand than your right foot and even more so than your right eye.

It’s not strange to find people who favor the opposite hand and foot (e.g. left hand and right foot), and some people are lucky enough to be ambidextrous, meaning they can use their left and right sides with equal skill.

Try testing others and coming to your on conclusions about what side the human body favors and why.

Extra: Are you more likely to be left handed if one of your parents is left handed? What are some of the possible disadvantages for left handed people? (Tools, writing materials etc) Do left handed people have an advantage in sports?

Interesting fact: In 2009, only 7% of the players in the NBA were left handed while in 2008 around 26% of MLB pitchers were left handed.

Is it better to be left handed in some sports than others? What do you think?

Which eye is dominant?

Which foot is dominant?

Make Your Own Rainbow

What you'll need:

  • A glass of water (about three quarters full)
  • White paper
  • A sunny day

Instructions:

  1. Take the glass of water and paper to a part of the room with sunlight (near a window is good).
  2. Hold the glass of water (being careful not to spill it) above the paper and watch as sunlight passes through the glass of water, refracts (bends) and forms a rainbow of colors on your sheet of paper.
  3. Try holding the glass of water at different heights and angles to see if it has a different effect.

What's happening?

While you normally see a rainbow as an arc of color in the sky, they can also form in other situations. You may have seen a rainbow in a water fountain or in the mist of a waterfall and you can even make your own such as you did in this experiment.

Rainbows form in the sky when sunlight refracts (bends) as it passes through raindrops, it acts in the same way when it passes through your glass of water. The sunlight refracts, separating it into the colors red, orange, yellow, green, blue, indigo and violet.

Prism rainbow

Make a Crystal Snowflake!

What you'll need:

  • String
  • Wide mouth jar
  • White pipe cleaners
  • Blue food coloring (optional)
  • Boiling water (take care or better still get an adult to help)
  • Borax
  • Small wooden rod or pencil

Instructions:

  1. Grab a white pipe cleaner and cut it into three sections of the same size. Twist these sections together in the center so that you now have a shape that looks something like a six-sided star. Make sure the points of your shape are even by trimming them to the same length.

  2. Take the top of one of the pipe cleaners and attach another piece of string to it. Tie the opposite end to your small wooden rod or pencil. You will use this to hang your completed snowflake.

  3. Carefully fill the jar with boiling water (you might want to get an adult to help with this part).

  4. For each cup of water add three tablespoons of borax, adding one tablespoon at a time. Stir until the mixture is dissolved but don’t worry if some of the borax settles at the base of the jar.

  5. Add some of the optional blue food coloring if you'd like to give your snowflake a nice bluish tinge.

  6. Put the pipe cleaner snowflake into the jar so that the small wooden rod or pencil is resting on the edge of the jar and the snowflake is sitting freely in the borax solution.

  7. Leave the snowflake overnight and when you return in the morning you will find the snowflake covered in crystals! It makes a great decoration that you can show your friends or hang somewhere in your house.

What's happening?

Crystals are made up of molecules arranged in a repeating pattern that extends in all three dimensions. Borax is also known as sodium borate, it is usually found in the form of a white powder made up of colorless crystals that are easily dissolved in water.

When you add the borax to the boiling water you can dissolve more than you could if you were adding it to cold water, this is because warmer water molecules move around faster and are more spread apart, allowing more room for the borax crystals to dissolve.

When the solution cools, the water molecules move closer together and it can't hold as much of the borax solution. Crystals begin to form on top of each other and before you know it you have your completed crystal snow flake!

Make a crystal snowflake


Find Microscopic Creatures in Water

What you'll need:

  • A concave slide
  • A dropper
  • A microscope
  • Different samples of water (tap water, pond water, muddy water etc). Near plants or in the mud are good places to take samples as they usually contain more microorganisms.

Instructions:

  1. Set up you microscope, preferably using its highest setting.

  2. Use the dropper to take some water from one of your samples and put it on the concave slide. Focus the microscope, what can you see? Be patient if you can't see anything. If you still can't see anything and have checked that you are in focus, try a different water sample.

  3. Look at how the creatures move. After observing their movements you might like to record their behaviors and draw them.

What are you looking at?

Some of the creatures and microorganisms you might be able to see include:

  • Euglenas - These are between a plant and an animal, they have a long tail called a flagellum which allows them to move.

  • Protozoa - They have a flagella (tail) which can be hard to see, the difference between protozoa and algae is often hard to define.

  • Amoebas - These microorganisms swim by wobbling. They also surround their food like a blob in order to eat it.

  • Algae - Not considered to be plants by most scientists, these organisms might be colored yellowish, greenish or reddish. They may also be found by themselves or in chains.

  • There might even my larger creatures such as worms or brine shrimp in your water samples, depending on where you took them from.

What kind of microorganisms can you find in water?

Invisible Ink with Lemon Juice

What you'll need:

  • Half a lemon
  • Water
  • Spoon
  • Bowl
  • Cotton bud
  • White paper
  • Lamp or other light bulb

Instructions:

  1. Squeeze some lemon juice into the bowl and add a few drops of water.
  2. Mix the water and lemon juice with the spoon.
  3. Dip the cotton bud into the mixture and write a message onto the white paper.
  4. Wait for the juice to dry so it becomes completely invisible.
  5. When you are ready to read your secret message or show it to someone else, heat the paper by holding it close to a light bulb.

What's happening?

Lemon juice is an organic substance that oxidizes and turns brown when heated. Diluting the lemon juice in water makes it very hard to notice when you apply it the paper, no one will be aware of its presence until it is heated and the secret message is revealed. Other substances which work in the same way include orange juice, honey, milk, onion juice, vinegar and wine. Invisible ink can also be made using chemical reactions or by viewing certain liquids under ultraviolet (UV) light.

Invisible ink with lemon juice

Will the Ice Melt and Overflow?

What you'll need:

  • A clear glass
  • Warm water
  • An ice cube

Instructions:

  1. Fill the glass to the top with warm water.
  2. Gently lower in the ice cube, making sure you don’t bump the table or spill any water over the edge of the glass.
  3. Watch the water level carefully as the ice cube melts, what happens?

What's happening?

Even though the ice cube melted the water doesn’t overflow. When water freezes to make ice it expands and takes up more space than it does as liquid water (that’s why water pipes sometimes burst during cold winters). The water from the ice takes up less space than the ice itself. When the ice cube melts, the level of the water stays about the same.

Will the ice melt and overflow?


Baking Soda & Vinegar Volcano

What you'll need:

  • Baking Soda (make sure it's not baking powder)
  • Vinegar
  • A container to hold everything and avoid a big mess!
  • Paper towels or a cloth (just in case)

Instructions:

  1. Place some of the baking soda into your container.
  2. Pour in some of the vinegar
  3. Watch as the reaction takes place!

What's happening?

The baking soda (sodium bicarbonate) is a base while the vinegar (acetic acid) is an acid. When they react together they form carbonic acid which is very unstable, it instantly breaks apart into water and carbon dioxide, which creates all the fizzing as it escapes the solution.

For extra effect you can make a realistic looking volcano. It takes some craft skills but it will make your vinegar and baking soda eruptions will look even more impressive!

baking soda & vinegar volcano experiment

What is the Volume of Your Lungs?


What you'll need:

  • Clean plastic tubing
  • A large plastic bottle
  • Water
  • Kitchen sink or large water basin

Instructions:

  1. Make sure the plastic tubing is clean
  2. Put about 10cm of water into your kitchen sink.
  3. Fill the plastic bottle right to the top with water.
  4. Put your hand over the top of the bottle to stop water escaping when you turn it upside down.
  5. Turn the bottle upside down. Place the top of the bottle under the water in the sink before removing your hand.
  6. Push one end of the plastic tube into the bottle.
  7. Take a big breath in.
  8. Breathe out as much air as you can through the tube.
  9. Measure the volume of air your lungs had in them.
  10. Make sure you clean up the area to finish.

What's happening?

As you breathe out through the tube, the air from your lungs takes the place of the water in the bottle. If you made sure you took a big breath in and breathed out fully then the resulting volume of water you pushed out is equivalent to how much air your lungs can hold. Having a big air capacity in your lungs means you can distribute oxygen around your body at a faster rate. The air capacity of lungs (or VO2 max) increases naturally as children grow up but can also be increased with regular exercise.

What is the volume of your lungs?


Bend A Straw With Your Eyes

What you'll need:

  • A glass half filled with water
  • A straw
  • 2 eyes (preferably yours)

Instructions:

  1. Look at the straw from the top and bottom of the glass.
  2. Look at the straw from the side of the glass, focus on the point where the straw enters the water, what is strange about what you see?

What's happening?

Our eyes are using light to see various objects all the time, but when this light travels through different mediums (such as water & air) it changes direction slightly. Light refracts (or bends) when it passes from water to air. The straw looks bent because you are seeing the bottom part through the water and air but the top part through the air only. Air has a refractive index of around 1.0003 while water has a refractive index of about 1.33.

easy experiments

Relax with Beautiful Bath Salts

What you'll need:

  • 1 cup of washing soda
  • A plastic bag
  • A rolling pin (or something similar that can crush lumps)
  • A bowl
  • A spoon for stirring
  • Essential oil
  • Food coloring

Instructions:

  1. Take the cup of washing soda and put it into a plastic bag. Crush the lumps with a rolling pin or similar object.
  2. Empty the bag into a bowl and stir in 5 or 6 drops of your favorite essential oil such as rosemary, lavender or mint.
  3. Stir in a few drops of food coloring until the mixture is evenly colored.
  4. Put the mixture into clean dry containers and enjoy as you please.

What's happening?

Bath Salts are typically made from Epsom salts (magnesium sulfate), table salt (sodium chloride) or washing soda (sodium carbonate). The chemical make up of the mixture makes it easy to form a lather. Bath salts are said to improve cleaning and deliver an appealing fragrance when bathing.

Relax with beautiful bath salts

Crazy Putty

What you'll need:

  • 2 containers (1 smaller than the other, preferably a film canister)
  • Water
  • Food colouring
  • PVA glue
  • Borax solution (ratio of about 1 Tbsp of borax to a cup of water)

Instructions:

  1. Fill the bottom of the larger container with PVA glue.
  2. Add a few squirts of water and stir.
  3. Add 2 or 3 drops of food colouring and stir.
  4. Add a squirt of borax (possibly a bit more depending on how much PVA glue you used).
  5. Stir the mixture up and put it into the smaller container. By now the mixture should be joining together, acting like putty, crazy putty!

What's happening?

The PVA glue you use is a type of polymer called polyvinyl acetate (PVA for short), while the borax is made of a chemical called sodium borate. When you combine the two in a water solution, the borax reacts with the glue molecules, joining them together into one giant molecule. This new compound is able to absorb large amounts of water, producing a putty like substance which you can squish in your hands or even bounce.

Warm air needs more room

What you'll need:

  • Empty bottle
  • Balloon
  • Pot of hot water (not boiling)

Instructions:

  1. Stretch the balloon over the mouth of the empty bottle.
  2. Put the bottle in the pot of hot water, let it stand for a few minutes and watch what happens.

What's happening?

As the air inside the balloon heats up it starts to expand. The molecules begin to move faster and further apart from each other. This is what makes the balloon stretch. There is still the same amount of air inside the balloon and bottle, it has just expanded as it heats up.

Warm air therefore takes up more space than the same amount of cold air, it also weighs less than cold air occupying the same space. You might have seen this principle in action if you've flown in or watched a hot air balloon.

Use a balloon to see why warm air takes up more room than cold air

Dissolving sugar at different heats

What you'll need:

  • Sugar cubes
  • Cold water in a clear glass
  • Hot water in a clear glass (be careful with the hot water)
  • Spoon for stirring

Instructions:

  1. Make sure the glasses have an equal amount of water.
  2. Put a sugar cube into the cold water and stir with the spoon until the sugar disappears. Repeat this process (remembering to count the amount of sugar cubes you put into the water) until the sugar stops dissolving, you are at this point when sugar starts to gather on the bottom of the glass rather than dissolving.
  3. Write down how many sugar cubes you could dissolve in the cold water.
  4. Repeat the same process for the hot water, compare the number of sugar cubes dissolved in each liquid, which dissolved more?

What's happening?

The cold water isn't able to dissolve as much sugar as the hot water, but why? Another name for the liquids inside the cups is a 'solution', when this solution can no longer dissolve sugar it becomes a 'saturated solution', this means that sugar starts forming on the bottom of the cup.

The reason the hot water dissolves more is because it has faster moving molecules which are spread further apart than the molecules in the cold water. With bigger gaps between the molecules in the hot water, more sugar molecules can fit in between.

Will more sugar dissolve in hot or cold water?

Make Your Own Quick Sand

What you'll need:

  • 1 cup of maize cornflour
  • Half a cup of water
  • A large plastic container
  • A spoon

Instructions:

  1. This one is simple, just mix the cornflour and water thoroughly in the container to make your own instant quick sand.
  2. When showing other people how it works, stir slowly and drip the quick sand to show it is a liquid.
  3. Stirring it quickly will make it hard and allow you to punch or poke it quickly (this works better if you do it fast rather than hard).
  4. Remember that quick sand is messy, try to play with it outside and don’t forget to stir just before you use it.
  5. Always stir instant quicksand just before you use it!

What's happening?

If you add just the right amount of water to cornflour it becomes very thick when you stir it quickly. This happens because the cornflour grains are mixed up and can’t slide over each other due to the lack of water between them. Stirring slowly allows more water between the cornflour grains, letting them slide over each other much easier.

Poking it quickly has the same effect, making the substance very hard. If you poke it slowly it doesn’t mix up the mixture in the same way, leaving it runny. It works in much the same way as real quick sand.

Make your own quicksand

Design and test a parachute

What you'll need:

  • A plastic bag or light material
  • Scissors
  • String
  • A small object to act as the weight, a little action figure would be perfect

Instructions:

  1. Cut out a large square from your plastic bag or material.
  2. Trim the edges so it looks like an octagon (an eight sided shape).
  3. Cut a small whole near the edge of each side.
  4. Attach 8 pieces of string of the same length to each of the holes.
  5. Tie the pieces of string to the object you are using as a weight.
  6. Use a chair or find a high spot to drop your parachute and test how well it worked, remember that you want it to drop as slow as possible.

What's happening?

Hopefully your parachute will descend slowly to the ground, giving your weight a comfortable landing. When you release the parachute the weight pulls down on the strings and opens up a large surface area of material that uses air resistance to slow it down. The larger the surface area the more air resistance and the slower the parachute will drop.

Cutting a small hole in the middle of the parachute will allow air to slowly pass through it rather than spilling out over one side, this should help the parachute fall straighter.

Test your parachute with a small action figure before trying it on a person


Make an egg float in salt water

What you'll need:

  • One egg
  • Water
  • Salt
  • A tall drinking glass

Instructions:

  1. Pour water into the glass until it is about half full.
  2. Stir in lots of salt (about 6 tablespoons).
  3. Carefully pour in plain water until the glass is nearly full (be careful to not disturb or mix the salty water with the plain water).
  4. Gently lower the egg into the water and watch what happens.

What's happening?

Salt water is denser than ordinary tap water, the denser the liquid the easier it is for an object to float in it. When you lower the egg into the liquid it drops through the normal tap water until it reaches the salty water, at this point the water is dense enough for the egg to float. If you were careful when you added the tap water to the salt water, they will not have mixed, enabling the egg to amazingly float in the middle of the glass.

Make an egg float in water

Energy transfer through balls

What you'll need:

  • A large, heavy ball such as a basketball or soccer ball
  • A smaller, light ball such as a tennis ball or inflatable rubber ball

Instructions:

  1. Make sure you're outside with plenty of room.
  2. Carefully put the tennis ball on top of the basketball, holding one hand under the basketball and the other on top of the tennis ball.
  3. Let go of both the balls at exactly the same time and observe what happens.

What's happening?

If you dropped the balls at the same time, the tennis ball should bounce off the basketball and fly high into the air. The two balls hit each other just after they hit the ground, a lot of the kinetic energy in the larger basketball is transferred through to the smaller tennis ball, sending it high into the air.

While you held the balls in the air before dropping them they had another type of energy called 'potential energy', the balls gained this through the effort it took you to lift the balls up, it is interesting to note that energy is never lost, only transferred into other kinds of energy.

the smaller ball should bounce really high

Energy transfer through bouncing balls on top of eachother

Make a ping pong ball float

What you'll need:

  • At least 1 ping pong ball (2 or 3 would be great)
  • A hair dryer

Instructions:

  1. Plug in the hair dryer and turn it on.
  2. Put it on the highest setting and point it straight up.
  3. Place your ping pong ball above the hair dryer and watch what happens.

What's happening?

Your ping pong ball floats gently above the hair dryer without shifting sideways or flying across the other side of the room. The airflow from the hair dryer pushes the ping pong ball upwards until its upward force equals the force of gravity pushing down on it. When it reaches this point it gently bounces around, floating where the upward and downward forces are equal.

The reason the ping pong ball stays nicely inside the column of air produced by the hair dryer without shifting sideways is due to air pressure. The fast moving air from the hair dryer creates a column of lower air pressure, the surrounding higher air pressure forces the ping pong ball to stay inside this column, making it easy to move the hair dryer around without losing control of the ping pong ball.

See if you can float 2 or even 3 ping pong balls as an extra challenge.

ping pong ball

hair dryer

Making Lemonade Fizzy Drink

What you'll need:

  • Lemon
  • Drinking glass
  • Water
  • 1 teaspoon of baking soda
  • Some sugar to make it sweet

Instructions:

  1. Squeeze as much of the juice from the lemon as you can into the glass.
  2. Pour in an equal amount of water as lemon juice.
  3. Stir in the teaspoon of baking soda.
  4. Give the mixture a taste and add in some sugar if you think it needs to be sweeter.

What's happening?

The mixture you created should go bubbly and taste like a lemonade, soda, fizzy or soft drink, if you added some sugar it might even taste like a lemon flavoured soft drink you've bought at a store. The bubbles that form when you add the baking soda to the lemon mixture are carbon dioxide (CO2), these are the same bubbles you'll find in proper fizzy drinks. Of course they add a few other flavored sweeteners but it's not much different to what you made. If you are wondering how the carbon dioxide bubbles formed, it was because you created a chemical reaction when you added the lemon (an acid) to the baking soda (a base).

Lemon used for making your own lemonade fizzy soda softdrink

Mixing Oil & Water

What you'll need:

  • Small soft drink bottle
  • Water
  • Food colouring
  • 2 tablespoons of cooking oil
  • Dish washing liquid or detergent

Instructions:

  1. Add a few drops of food colouring to the water.
  2. Pour about 2 tablespoons of the coloured water along with the 2 tablespoons of cooking oil into the small soft drink bottle.
  3. Screw the lid on tight and shake the bottle as hard as you can.
  4. Put the bottle back down and have a look, it may have seemed as though the liquids were mixing together but the oil will float back to the top.

What's happening?

While water often mixes with other liquids to form solutions, oil and water does not. Water molecules are strongly attracted to each other, this is the same for oil, because they are more attracted to their own molecules they just don't mix together. They separate and the oil floats above the water because it has a lower density.

If you really think oil and water belong together then try adding some dish washing liquid or detergent. Detergent is attracted to both water and oil helping them all join together and form something called an emulsion. This is extra handy when washing those greasy dishes, the detergent takes the oil and grime off the plates and into the water, yay!

Does oil mix well with water?

Experimenting with Static Electricity

What you'll need:

  • 2 inflated balloons with string attached
  • Your hair
  • Aluminium can
  • Woolen fabric

Instructions:

  1. Rub the 2 balloons one by one against the woolen fabric, then try moving the balloons together, do they want to or are they unattracted to each other?
  2. Rub 1 of the balloons back and forth on your hair then slowly it pull it away, ask someone nearby what they can see or if there's nobody else around try looking in a mirror.
  3. Put the aluminium can on its side on a table, after rubbing the balloon on your hair again hold the balloon close to the can and watch as it rolls towards it, slowly move the balloon away from the can and it will follow.

What's happening?

Rubbing the balloons against the woolen fabric or your hair creates static electricity. This involves negatively charged particles (electrons) jumping to positively charged objects. When you rub the balloons against your hair or the fabric they become negatively charged, they have taken some of the electrons from the hair/fabric and left them positively charged.

They say opposites attract and that is certainly the case in these experiments, your positively charged hair is attracted to the negatively charged balloon and starts to rise up to meet it. This is similar to the aluminium can which is drawn to the negatively charged balloon as the area near it becomes positively charged, once again opposites attract.

In the first experiment both the balloons were negatively charged after rubbing them against the woolen fabric, because of this they were unattracted to each other.

Static electricity

Negatively charged balloon


How fast do water molecules move?

What you'll need:

  • A clear glass filled with hot water
  • A clear glass filled with cold water
  • Food coloring
  • An eye dropper

Instructions:

  1. Fill the glasses with the same amount of water, one cold and one hot.
  2. Put one drop of food coloring into both glasses as quickly as possible.
  3. Watch what happens to the food colouring.

What's happening?

If you watch closely you will notice that the food coloring spreads faster throughout the hot water than in the cold. The molecules in the hot water move at a faster rate, spreading the food coloring faster than the cold water molecules which mover slower.

Gravity free water in a glass

Use a balloon to amplify sound


What you'll need:

  • Balloon

Instructions:

  1. Blow up the balloon.
  2. Hold the balloon close to your ear while you tap lightly on the other side.

What's happening?

Despite you only tapping lightly on the balloon your ears can hear the noise loudly. When you blew up the balloon you forced the air molecules inside the balloon closer to each other. Because the air molecules inside the balloon are closer together, they become a better conductor of sound waves than the ordinary air around you.

Use a balloon to amplify sound

Making Music with Glasses of Water


What you'll need:

  • 5 or more drinking glasses or glass bottles
  • Water
  • Wooden stick such as a pencil

Instructions:

  1. Line the glasses up next to each other and fill them with different amounts of water. The first should have just a little water while the last should almost full, the ones in between should have slightly more than the last.
  2. Hit the glass with the least amount of water and observe the sound, then hit the glass with the most water, which makes the higher sound?
  3. Hit the other glasses and see what noise they make, see if you can get a tune going by hitting the glasses in a certain order.

What's happening?

Each of the glasses will have a different tone when hit with the pencil, the glass with the most water will have the lowest tone while the glass with the least water will have the highest. Small vibrations are made when you hit the glass, this creates sound waves which travel through the water. More water means slower vibrations and a deeper tone.

Music

Using water in drinking glasses to make music


What absorbs more heat?


What you'll need:

  • 2 identical drinking glasses or jars
  • Water
  • Thermometer
  • 2 elastic bands or some sellotape
  • White paper
  • Black paper

Instructions:

  1. Wrap the white paper around one of the glasses using an elastic band or sellotape to hold it on.
  2. Do the same with the black paper and the other glass.
  3. Fill the glasses with the exact same amount of water.
  4. Leave the glasses out in the sun for a couple of hours before returning to measure the temperature of the water in each.

What's happening?

Dark surfaces such as the black paper absorb more light and heat than the lighter ones such as the white paper. After measuring the temperatures of the water, the glass with the black paper around it should be hotter than the other. Lighter surfaces reflect more light, that's why people where lighter colored clothes in the summer, it keeps them cooler.

What absorbs more light & heat, black or white?